3D-Printed Model of Implant for Pectus Excavatum
Purchased from Istock.com. Copyright.
The ÉTS Laboratory on Shape Memory Alloys and Intelligent Systems (LAMSI) collaborated with the Centre de chirurgie plastique de L’Île-des-Sœurs in developing a personalized implant to correct pectus excavatum using CT scans of a patient’s chest, and in producing the implant through 3D printing technology. Pectus excavatum is a congenital defect of the chest wall that can be surgically corrected with a silicone implant inserted under the skin (onlay prostheses). The degree of severity of the deformity can be characterized by morphological indicators, calculated from the patient’s anatomy. A clinical case was used to present the design and manufacturing method of the 3D-printed model used to produce the mould used in casting a silicone implant.
Pectus Excavatum
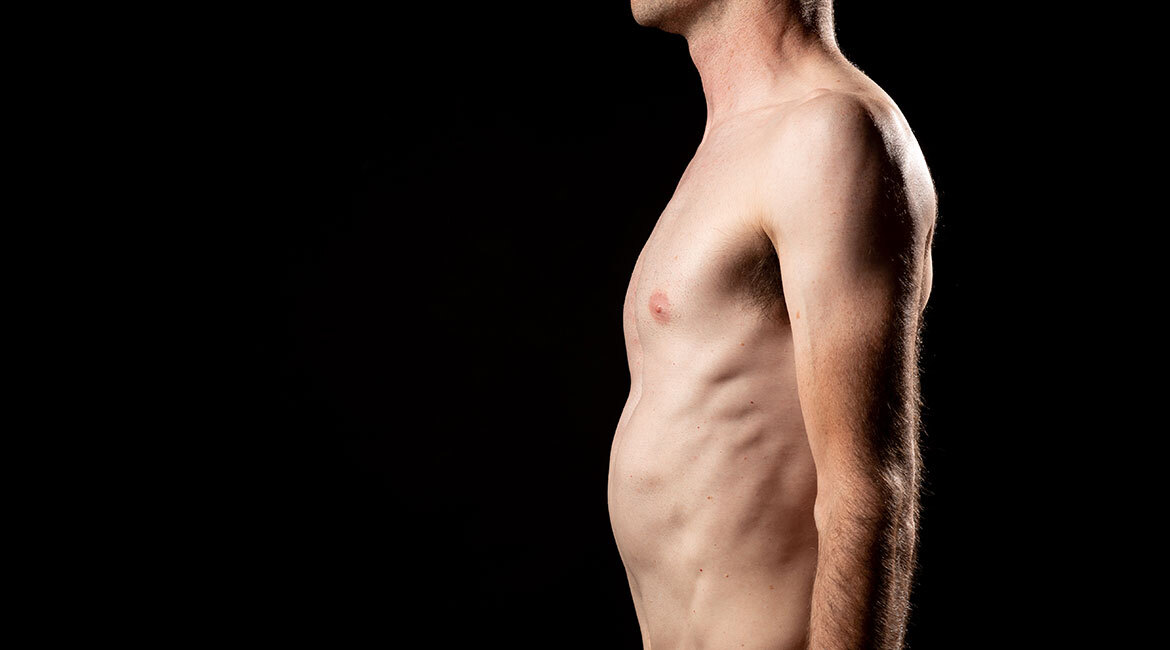
Pectus excavatum, also known as funnel chest, is a congenital defect of the chest wall that affects 1:300 to 1:1000 individuals. This deformity rarely compromises lung and/or heart functions, but most often causes aesthetic discomfort. This discomfort is significant in the majority of cases, causing low self-esteem in people living with the condition, and can be alleviated with corrective surgery. The operation can be extensive, modifying the geometry of the rib cage, or simple, modifying only the aesthetic aspect with the help of a silicone implant, comparable to an inlay on the rib cage.
Implant Design to Correct Pectus Excavatum
The most common treatments for pectus excavatum are the Ravitch and Nuss operations, which repair the rib cage using metal instruments [1]. When this deformity does not affect respiratory or cardiac function, subcutaneous implantation of a silicone prosthesis can be used purely for aesthetic purposes. The most common manufacturing method of corrective implants involves the use of a silicone implant constructed from an imprint taken on the skin surface [2, 3]. However, this technique does not provide the level of detail required for proper correction and carries the risk of implant displacement after surgery. Thanks to advances in imaging and computer-aided design (CAD) software, it is now possible to design implants based on the exact geometry of the patient’s chest wall taken from CT scans.
Implant designs based on this type of imaging give a more accurate rendition of the deformity and may therefore offer better correction and simplified installation. However, there are no objective design methods that achieve normal aesthetic standards from scanned images. In order to produce an implant to adequately correct the deformity, it seems more relevant to base the design on the calculation of so-called morphological indices that reflect the anatomy of the patient’s chest.
These morphological indices are used to diagnose and assess the severity of the pectus excavatum. They are based on calculations of length ratios at the greatest lateral distances from the chest wall. Three indices in particular can be calculated: the anthropometric index (AI), the Haller index and the low vertebral index (LVI) [4].
In the context of this case study, a patient of the clinic underwent CT scans, and the data were forwarded to the LAMSI team for analysis and design of a model of the silicone implant to be installed during a plastic surgery procedure. The images clearly show the depression of the chest wall (Figure 1a, b, c).
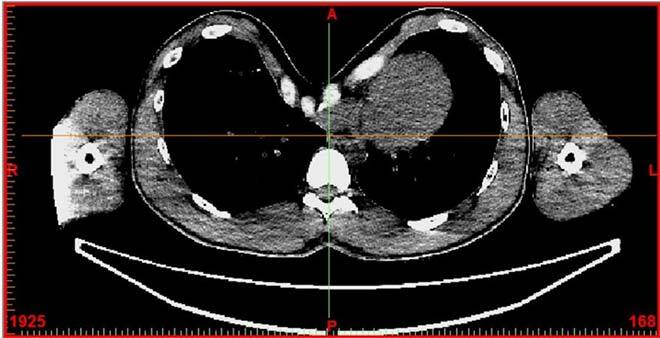
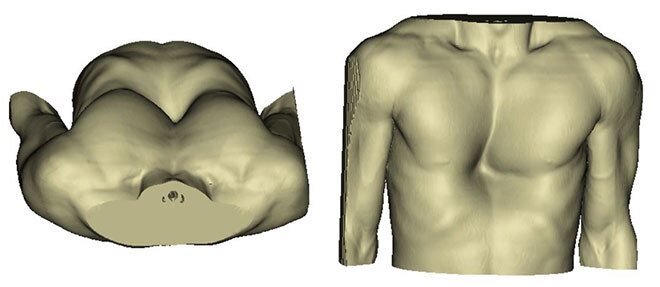
Figure 1: a) Section view of the patient’s rib cage taken from CT scans (white: bones, grey: soft tissues); b) Transverse view of the deformity; c) Front view of the deformity.
The measurements used to calculate the AI are presented in Figure 2 a; those of the Haller index in Figure 2 b; and those of the LVI, in Figure 2 c. The anthropometric index is based on the ratio between the depth of pectus excavatum (62.29 mm) and the maximum anteroposterior distance from the chest wall (216.8 mm). The Haller index is based on the ratio between the maximum latero-lateral distance (285.15 mm) and the shortest anteroposterior distance (30.67 mm). The LVI is based on the ratio between the vertebral sagittal diameter (63.52 mm) and the diameter of the posterior board of the sternum to the posterior portion of the vertebral body (98.90 mm) [4].
All three indices indicated that the case did indeed present a pectus excavatum according to the literature (Table 1). Designing a 3D-printed model to mould a silicone implant was therefore justified (see next section).
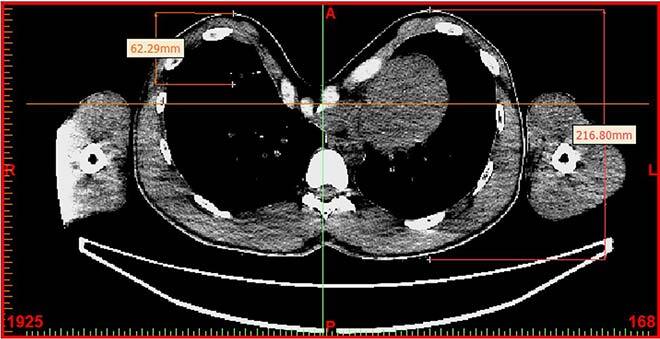
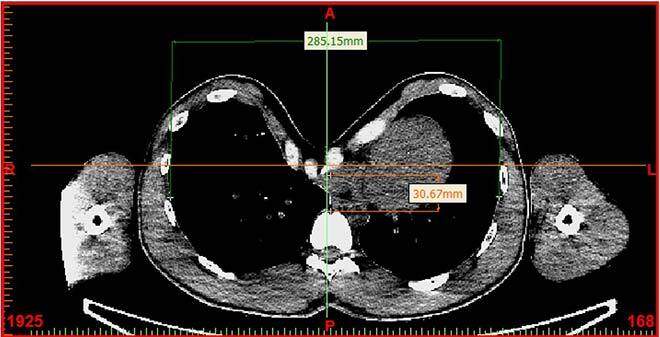
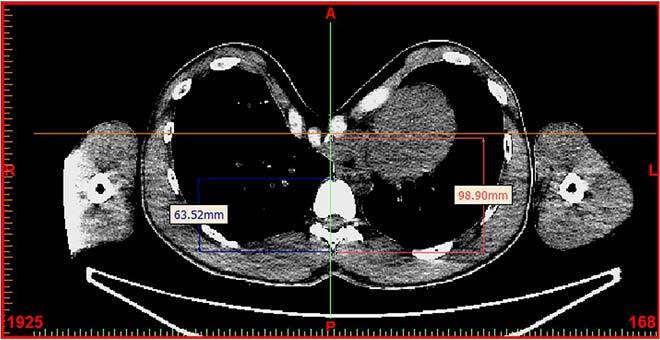
Figure 2: Measurements of morphological indices before implantation: a) AI; b) Haller index; c) LVI
Table 1: Morphological indices of the patient before implant placement and normal morphological indices [4]

Implant Design
The implant was designed using Mimics (Materialise) medical imaging software. The initial phase was the reconstruction of the chest anatomy; the second phase was the design of the implant.
Reconstructing the chest anatomy was a necessary step since the software works in thresholds: it displays segmented objects corresponding to a set of pixel values of the same intensity. The pixels of the chest wall are supposed to have the same intensity since they represent bones of the same density. However, depending on the quality of the images and their import into the software, image quality may be altered (Figure 3).
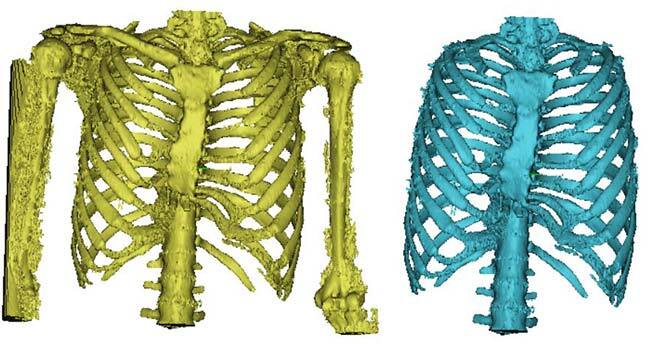
Figure 3: a) Unreconstructed chest wall; b) Reconstructed chest wall.
This phase was essential to start the implant design phase, because the implant was to be placed directly on the chest wall during the operation and the muscles incised to access the chest wall would rest on the implant. Modelling of the chest anatomy had to be as accurate as possible to ensure shape compatibility with the implant.
The implant was designed layer by layer to fit as closely as possible to the shape of the deformed chest wall. The measurement in Figure 4 reflects the implant thickness (green), which was used to bridge the difference in depth between the two sides at this level of the chest wall.
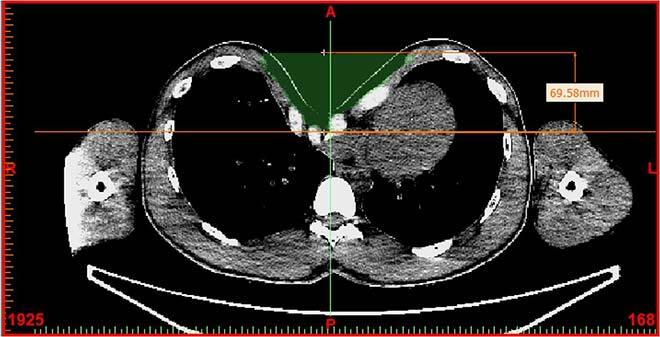
Figure 4: Implant design
The procedure was repeated several times, and a volume was generated from the different layers. The shape of the chest wall was deliberately marked on the part (Figure 5) to ensure that the silicone implant fit snugly on the chest wall. Details were added to the implant in order to facilitate its positioning by the surgeon during the operation: a groove was centred on the sternum to align the implant, and a measurement of the distance between the top of the sternum and the top of the implant was indicated (Figure 6).
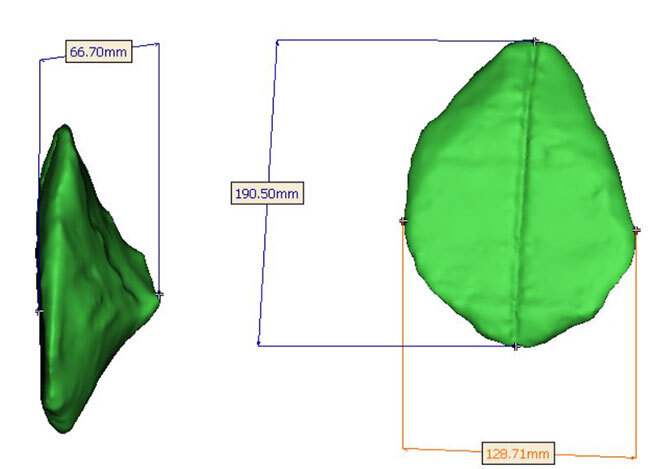
Figure 5: Rendering of the final implant and its dimensions
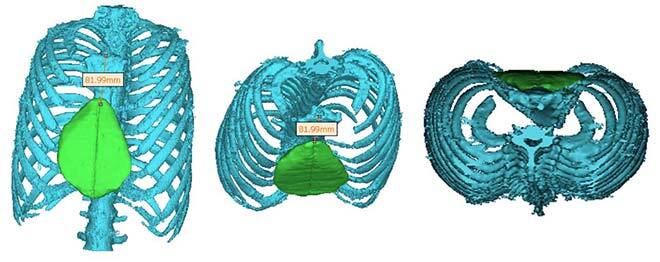
Figure 6: Aligning the implant on the chest wall, and sternum-to-implant distance
Once the implant model was designed, the morphological indices were recalculated to evaluate the correction of the deformity. New measurements relative to the implant (Figure 7) were used to establish new indices and to determine if the patient with the implant no longer had pectus excavatum, based on the values of the Anthropometric index (AI) and the Haller index (Table 2). The LVI was not within the range of the so-called normal measurements (Table 2) since this index is based on the actual position of the bones, which remained unchanged after implant placement.
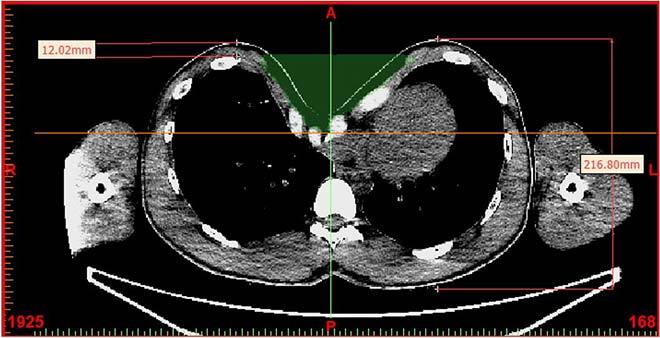
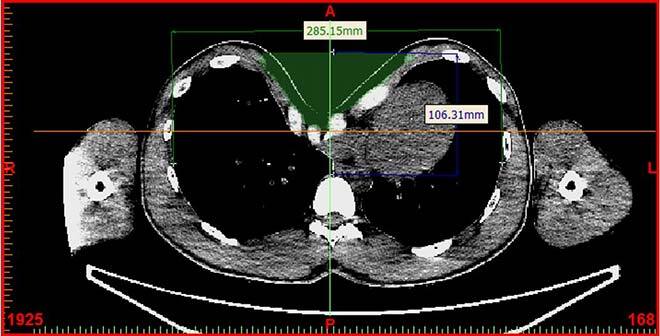
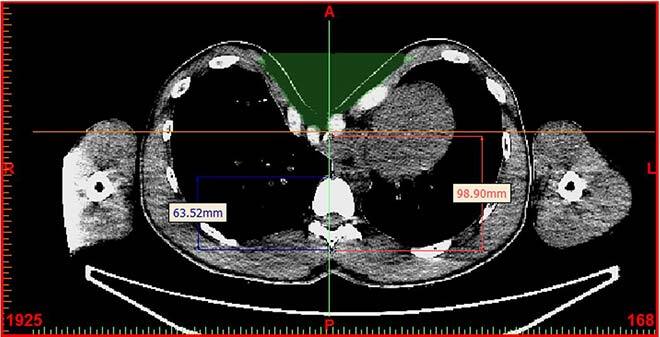
Figure 7: Measurements of morphological indices after implantation (projection): a) AI; b) Haller index; c) LVI
Table 2: Morphological indices of the patient after implant placement (projection)

Production Preparation and Printing
The designed model was then 3D printed (Figure 8) on a Fortus 250mc system (Stratasys) using the fused deposition modeling technique (FDM). The printing parameters—orientation of the part (green, Figure 8), supports (orange, Figure 8)—were controlled with the GrabCAD software (Stratasys). In the finishing phase, the printed part (Figure 9) was sanded to smooth the surfaces and make them more homogeneous. The finished part was then used to make a mould for the silicone implant.
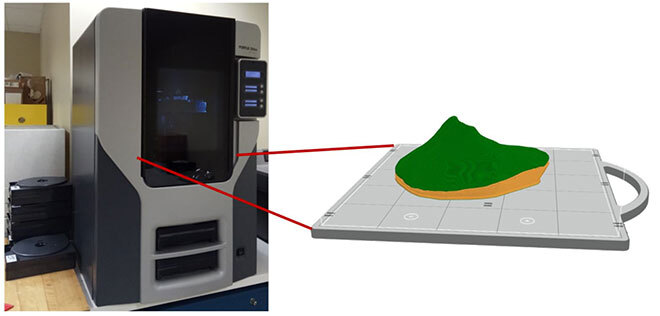
Figure 8: 3D printer and printing simulation with supports
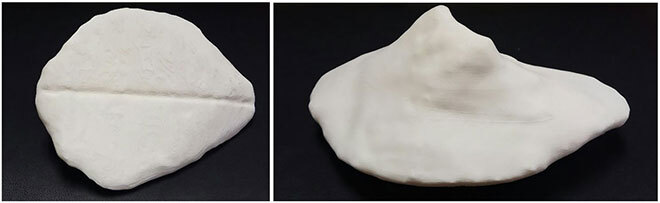
Figure 9: 3D-printed implant model
Clinical Study
As the methodology is not licensed, Health Canada approval is required on a case-by-case basis. This case study was used for such a request and allowed a patient to correct his pectus excavatum thanks to the design and production of a custom implant. Before and after photos of the surgery show a clear improvement of the patient’s chest deformity (Figure 10).
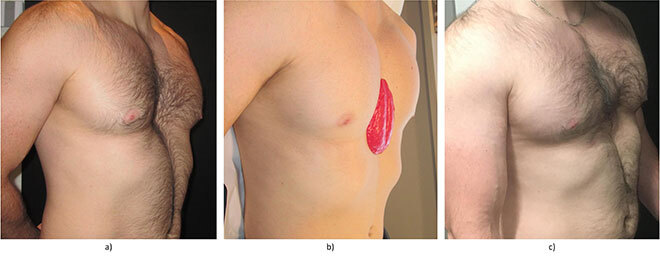
Figure 10: a) Photo of the patient before implant placement; b) Photo of the patient with a model of the implant; c) Photo of the patient after implant placement